Price Clear


Gundam Parts

Showing 31 - 60 of 1224 products

img
SAVERM8.09

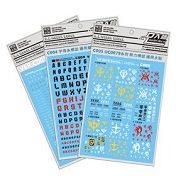
1/144 Scale Over Flag Decal Sheet

Gundam decal sheet recommended for use on HG Over Flags, Union Flags and Union Flags Custom II Kits

RM3.90
img
SAVERM8.09

[Bandai]1/144 scale Zeon Decal Sheet

  • 1/144 Gundam decal sheet recommended for use on HGUC Zaku, Zaku II, Neo Zeong kits.

RM3.90
img
SAVERM8.90

Water Decal HG Beargguy III

- Water Decal for HG BEARGGUY III water decal
- Not pre-cut
- Best use with Mr. Hobby Mr. Mark Setter / Softer
- 11 cm x 15 cm

Tools:

* Decals
* Mr. Mark Setter (optional)
* Mr. Mark Softer (optional)
* Water
* Cotton buds
* Tweezers
* Paper towel
* Pen Knife

Instructions :
1. Again, cut out the design you want from the decal sheet
2. Using a pair of tweezers/forceps, pick up the decal you cut out and dip in water for roughly 8 seconds. I found that Bandai water-slide decals need less time, maybe 4-6 seconds while custom decals might take longer than 8 seconds. The purpose of this step is to detach the decal from the decal sheet.
3. Using a cotton bud dipped in water, gently ‘tease’ the decal away from the decal sheet and onto your gunpla. If the decal won’t budge from the decal sheet, dip in water for a couple more seconds.
4. Once the decal is on your gunla, you can still adjust or reposition the decal. Once you’re satisfied with the position, use the dry end of the cotton bud to gently roll over decal to absorb extra water.


Water slide decals are activated by water. So it's important to store them away from liquid. 

RM9.00
img
SAVERM8.90

Water Decal HG 1/144 00 QAN[T] Gundam

- Water Decal for HG 1/144 00 QAN[T] Gundam
- Not pre-cut
- Best use with Mr. Hobby Mr. Mark Setter / Softer
- 11 cm x 15 cm

Tools:

* Decals
* Mr. Mark Setter (optional)
* Mr. Mark Softer (optional)
* Water
* Cotton buds
* Tweezers
* Paper towel
* Pen Knife

Instructions :
1. Again, cut out the design you want from the decal sheet
2. Using a pair of tweezers/forceps, pick up the decal you cut out and dip in water for roughly 8 seconds. I found that Bandai water-slide decals need less time, maybe 4-6 seconds while custom decals might take longer than 8 seconds. The purpose of this step is to detach the decal from the decal sheet.
3. Using a cotton bud dipped in water, gently ‘tease’ the decal away from the decal sheet and onto your gunpla. If the decal won’t budge from the decal sheet, dip in water for a couple more seconds.
4. Once the decal is on your gunla, you can still adjust or reposition the decal. Once you’re satisfied with the position, use the dry end of the cotton bud to gently roll over decal to absorb extra water.


Water slide decals are activated by water. So it's important to store them away from liquid. 

RM9.00
img
SAVERM8.90

Water Decal for MG 1/100 GAT-X103 BUSTER Gundam

- Water Decal for MG 1/100 GAT-X103 BUSTER Gundam
- Not pre-cut
- Best use with Mr. Hobby Mr. Mark Setter / Softer
- 11 cm x 15 cm

Tools:

* Decals
* Mr. Mark Setter (optional)
* Mr. Mark Softer (optional)
* Water
* Cotton buds
* Tweezers
* Paper towel
* Pen Knife

Instructions :
1. Again, cut out the design you want from the decal sheet
2. Using a pair of tweezers/forceps, pick up the decal you cut out and dip in water for roughly 8 seconds. I found that Bandai water-slide decals need less time, maybe 4-6 seconds while custom decals might take longer than 8 seconds. The purpose of this step is to detach the decal from the decal sheet.
3. Using a cotton bud dipped in water, gently ‘tease’ the decal away from the decal sheet and onto your gunpla. If the decal won’t budge from the decal sheet, dip in water for a couple more seconds.
4. Once the decal is on your gunla, you can still adjust or reposition the decal. Once you’re satisfied with the position, use the dry end of the cotton bud to gently roll over decal to absorb extra water.


Water slide decals are activated by water. So it's important to store them away from liquid. 

RM9.00
img
SAVERM17.18

Water Decal PG 1/60 FX-550 SKY GRASPER

- Water Decal for PG FX-550 SKY GRASPER water decal
- Not pre-cut
- Best use with Mr. Hobby Mr. Mark Setter / Softer
- 21 cm x 24 cm

Tools:

* Decals
* Mr. Mark Setter (optional)
* Mr. Mark Softer (optional)
* Water
* Cotton buds
* Tweezers
* Paper towel
* Pen Knife

Instructions :
1. Again, cut out the design you want from the decal sheet
2. Using a pair of tweezers/forceps, pick up the decal you cut out and dip in water for roughly 8 seconds. I found that Bandai water-slide decals need less time, maybe 4-6 seconds while custom decals might take longer than 8 seconds. The purpose of this step is to detach the decal from the decal sheet.
3. Using a cotton bud dipped in water, gently ‘tease’ the decal away from the decal sheet and onto your gunpla. If the decal won’t budge from the decal sheet, dip in water for a couple more seconds.
4. Once the decal is on your gunla, you can still adjust or reposition the decal. Once you’re satisfied with the position, use the dry end of the cotton bud to gently roll over decal to absorb extra water.


Water slide decals are activated by water. So it's important to store them away from liquid. 

RM18.80
img
SAVERM13.98

Water Decal for PG 1/60 MBF-02 Strike Rouge Gundam

- Water Decal for PG 1/60 MBF-02 Strike Rouge Gundam
- Not pre-cut
- Best use with Mr. Hobby Mr. Mark Setter / Softer
- 11.5 cm x 13.5 cm

Tools:

* Decals
* Mr. Mark Setter (optional)
* Mr. Mark Softer (optional)
* Water
* Cotton buds
* Tweezers
* Paper towel
* Pen Knife

Instructions :
1. Again, cut out the design you want from the decal sheet
2. Using a pair of tweezers/forceps, pick up the decal you cut out and dip in water for roughly 8 seconds. I found that Bandai water-slide decals need less time, maybe 4-6 seconds while custom decals might take longer than 8 seconds. The purpose of this step is to detach the decal from the decal sheet.
3. Using a cotton bud dipped in water, gently ‘tease’ the decal away from the decal sheet and onto your gunpla. If the decal won’t budge from the decal sheet, dip in water for a couple more seconds.
4. Once the decal is on your gunpla, you can still adjust or reposition the decal. Once you’re satisfied with the position, use the dry end of the cotton bud to gently roll over decal to absorb extra water.


Water slide decals are activated by water. So it's important to store them away from liquid. 

RM10.00
img
SAVERM15.08

HG 1/144 STRIKE FREEDOM Metal Effect Water Decal

- Water Decal for HG 1/144 Strike Freedom Gundam
- Not pre-cut
- Best use with Mr. Hobby Mr. Mark Setter / Softer
- 10 cm x 9 cm

Tools:

* Decals
* Mr. Mark Setter (optional)
* Mr. Mark Softer (optional)
* Water
* Cotton buds
* Tweezers
* Paper towel
* Pen Knife

Instructions :
1. Again, cut out the design you want from the decal sheet
2. Using a pair of tweezers/forceps, pick up the decal you cut out and dip in water for roughly 8 seconds. I found that Bandai water-slide decals need less time, maybe 4-6 seconds while custom decals might take longer than 8 seconds. The purpose of this step is to detach the decal from the decal sheet.
3. Using a cotton bud dipped in water, gently ‘tease’ the decal away from the decal sheet and onto your gunpla. If the decal won’t budge from the decal sheet, dip in water for a couple more seconds.
4. Once the decal is on your gunla, you can still adjust or reposition the decal. Once you’re satisfied with the position, use the dry end of the cotton bud to gently roll over decal to absorb extra water.


Water slide decals are activated by water. So it's important to store them away from liquid. 

RM14.90
img
SAVERM15.30

[Metal Part] MG 1/100 Hi-Nu Gundam Ver. Ka Metal Enhancement Part Set

All pictures shown are for illustration purpose only. Actual product may vary, kindly check from the list below to find out the actual product quantity.

Index


Parts


Installation
1.LED + 2 batteries x1direct installation
2.Vulcan Canon x2drill 1.3mm hole, attached to point with minor cement
3.Backpack + Calf thruster x4drill 2.0mm hole, attached to point with minor cement
4.Shoulder heavyarm screw x4drill 1.0mm hole, attached to point with minor cement
5.Forearm aviation hole x4drill 1.0mm hole, attached to point with minor cement
6.Metal hand joint cover (round shape) x4Direct installation, attached to point with minor cement
7.Chest Aviation hole x2drill 2.5mm hole, attached to point with minor cement
8.Metal knee joint cover (round shape) x4drill 1.0mm hole, attached to point with minor cement
9.Metal knee joint Hydraulic tube (round shape) x4drill 1.0mm hole, attached to point with minor cement
10.Knee and lower aviation hole x8drill 3.0mm hole, attached to point with minor cement
11.Shoulder Aviation hole x4drill 2.0mm hole, attached to point with minor cement
7.Arm Aviation hole x4drill 2.0mm hole, attached to point with minor cement
8.knee Aviation hole x4drill 2.0mm hole, attached to point with minor cement
9.Rear skirt Aviation hole x2drill 2.0mm hole, attached to point with minor cement
10.Metal hand joint cover (round shape) x4drill 2.0mm hole, attached to point with minor cement
11.Canon nozzle x1drill 2.0mm hole, attached to point with minor cement
12.Shield Aviation hole x12drill 2.0mm hole, attached to point with minor cement
13.Armor screw x10direct installation, attached to point with minor cement
14.Armor Screw 1.5mm x30drill 2.0mm hole, attached to point with minor cement
15.Armor aviation hole 1.6mm x15drill 1.6mm hole, attached to point with minor cement
16.Armor aviation hole 1.5mm x50drill 2.0mm hole, attached to point with minor cement
  • Packages parts packed in different sealed plastic bags to avoid scratch, and easier installation (based on numbers tagged on the plastic bag)
  • Model kits in pictures are only for illustration of finished metal parts installation and excluded in the package.
Tools needed for assembling metal parts:
  • tweezer straight/angled
  • modelling kits cutter
  • metal cutter
  • metal wire 
  • plastic model kits cement
  • magnifying glass

RM88.40
img
SAVERM30.20

[Metal Part] RE 1/100 Gundam Mk III Metal Enhancement Part Set

All pictures shown are for illustration purpose only. Actual product may vary, kindly check from the list below to find out the actual product quantity.

Index        Parts                                                 Installation
1.                Rear Thruster x3                         drill 2.5mm hole, attached to point with minor cement
2.                Backpack thruster - x3                 drill 3.5mm hole, attached to point with minor cement
3.                Calf thruster - x2                         drill 1.4mm hole, attached to point with minor cement
4.                Armor aviation hole x15         drill 2.0mm hole, attached to point with minor cement
5.               Single line Screw x30                 drill 2.0mm hole, attached to point with minor cement
  • Packages parts packed in different sealed plastic bags to avoid scratch, and easier installation (based on numbers tagged on the plastic bag)
  • Model kits in pictures are only for illustration of finished metal parts installation and excluded in the package.
Tools needed for assembling metal parts:
  • tweezer straight/angled
  • modelling kits cutter
  • metal cutter
  • metal wire 
  • plastic model kits cement
  • magnifying glass

RM73.50
img
SAVERM45.20

[Metal Part] RE100 Gundam GP04G Gerbera Metal Enhancement Part Set

All pictures shown are for illustration purpose only. Actual product may vary, kindly check from the list below to find out the actual product quantity.

Index


Parts


Installation
1.Shoulder thruster x2drill 1.5mm hole, attached to point with minor cement
2.Lower shoulder thruster x8drill 3.0mm hole, attached to point with minor cement
3.Aviation hole on shoulder x3drill 3.0mm hole, attached to point with minor cement
4.Backpack thruster x15drill 2.5mm hole, attached to point with minor cement
5.Aviation hole on armor x15drill 2.0mm hole, attached to point with minor cement
6.Single line screw x30drill 2.0mm hole, attached to point with minor cement
  • Packages parts packed in different sealed plastic bags to avoid scratch, and easier installation (based on numbers tagged on the plastic bag)
  • Model kits in pictures are only for illustration of finished metal parts installation and excluded in the package.
Tools needed for assembling metal parts:
  • tweezer straight/angled
  • modelling kits cutter
  • metal cutter
  • metal wire 
  • plastic model kits cement
  • magnifying glass

RM58.50
img
SAVERM3.60

[Metal Part] 4mm Zaku metallic Lens - Gold Colour

  • Diameter: 4.0mm
  • Gold colour lens
  • Thickness: 2.6mm
  • Material made: Copper
  • Suitable to fit on Bandai MG zaku 2.0 model kits

RM2.40
img
SAVERM9.49

[Metal Part] Modelling Kits Gatling Gun Bullet Chain - Gold Colour

  • Modelling Kits Gatling Gun Bullet Chain
  • Width:8mm, Length 200mm
  • Suitable for installation on this kits: Unicorn Gundam gatling gun, Heavy armor gatling gun, MG 1/100 MS-07B-3 Gouf Custom gatlin gun
  • Gatling Gun NOT INCLUDED

RM8.50
img
SAVERM9.49

[Metal Part] Modelling Kits Gatling Gun Bullet Chain - Silver Colour

  • Modelling Kits Gatling Gun Bullet Chain - silver colour chain
  • Width:8mm, Length 200mm
  • Suitable for installation on this kits: Unicorn Gundam gatling gun, Heavy armor gatling gun, MG 1/100 MS-07B-3 Gouf Custom gatlin gun
  • Gatling Gun NOT INCLUDED

RM8.50
img
SAVERM9.49

[Metal Part] Modelling Kits Gatling Gun Bullet Chain - Black Colour

  • Modelling Kits Gatling Gun Bullet Chain - black colour chain
  • Width:8mm, Length 200mm
  • Suitable for installation on this kits: Unicorn Gundam gatling gun, Heavy armor gatling gun, MG 1/100 MS-07B-3 Gouf Custom gatlin gun
  • Gatling Gun NOT INCLUDED

RM8.50
img
SAVERM16.30

MG Strike Gundam Metal Blade Part

  • MG Strike Gundam metal knife part
  • This unit consists of the metal knife only, no other model kit included.
  • More precise photo to come after photographer done capture the metal blade.

RM23.60
img
SAVERM4.90

[Third Party] Action Base 1 for MG 1/100 and RG,HG 1/144 (Gray)

[TGF] Action Base MG/HG (GREY)

  • NOTE: Adapter is all 8mm in size.

RM15.00
img
SAVERM10.10

[Third Party] Action Base 2 HG/RG (Black) (1/144)

[TGF] Action Base HG/RG (Black)


Suitable for every 1/144 scale and SD kit.
This is a Non-Bandai product.

RM9.80
img
SAVERM10.10

[Third Party] Action Base 2 HG/RG (Grey) (1/144)

A display stand for holding 1/144 scale Gundam models, includes various adapters and holders to fit almost any 1/144 Gundam kit! Assembles just like building a Gundam model itself

Larger 1/144 model kits may require the larger Action Base 1 for 1/100 models.

RM9.80
img
SAVERM10.10

[Third Party] Action Base 2 HG/RG (Clear) (1/144)

[TGF] Action Base HG/RG (Clear)


Suitable for every 1/144 scale and SD kit.
This is a Non-Bandai product.

RM9.80
img
SAVERM8.90

Water Decal MG 1/144 Gundam Seed Blitz Gundam

- Water Decal for Water Decal MG 1/144 Gundam Seed Blitz Gundam
- Not pre-cut
- Best use with Mr. Hobby Mr. Mark Setter / Softer
- 11 cm x 15 cm

Tools:

* Decals
* Mr. Mark Setter (optional)
* Mr. Mark Softer (optional)
* Water
* Cotton buds
* Tweezers
* Paper towel
* Pen Knife

Instructions :
1. Again, cut out the design you want from the decal sheet
2. Using a pair of tweezers/forceps, pick up the decal you cut out and dip in water for roughly 8 seconds. I found that Bandai water-slide decals need less time, maybe 4-6 seconds while custom decals might take longer than 8 seconds. The purpose of this step is to detach the decal from the decal sheet.
3. Using a cotton bud dipped in water, gently ‘tease’ the decal away from the decal sheet and onto your gunpla. If the decal won’t budge from the decal sheet, dip in water for a couple more seconds.
4. Once the decal is on your gunla, you can still adjust or reposition the decal. Once you’re satisfied with the position, use the dry end of the cotton bud to gently roll over decal to absorb extra water.


Water slide decals are activated by water. So it's important to store them away from liquid. 

RM9.00
img
SAVERM1.10

ABS Rod 240mm Long (mix 17pcs - circle, square) for DIY customize Model Kit

Material: ABS

Shapes:  Round, Square, Annulus (With Holes), Square (With Holes)

Package Contents :
-----------------------
Round rod
1. Diameter : 0.5mm+- ,Length : 24cm+-
2. Diameter : 1.0mm+- ,Length : 24cm+-
3. Diameter : 2.0mm+- ,Length : 24cm+-
4. Diameter : 3.0mm+- ,Length : 24cm+-
5. Diameter : 5.0mm+- ,Length : 24cm+-

Square rod
1. Diameter : 1.0mm+- ,Length : 24cm+-
2. Diameter : 1.5mm+- ,Length : 24cm+-
3. Diameter : 2.0mm+- ,Length : 24cm+-
4. Diameter : 3.0mm+- ,Length : 24cm+-
5. Diameter : 5.0mm+- ,Length : 24cm+-

Annulus (With Holes)
1. Diameter : 2.0mm+- ,Length : 24cm+-
2. Diameter : 3.0mm+- ,Length : 24cm+-
3. Diameter : 4.0mm+- ,Length : 24cm+-
4. Diameter : 5.0mm+- ,Length : 24cm+-

Square (With Holes)
1. Diameter : 3.0mm+- ,Length : 24cm+-
2. Diameter : 4.0mm+- ,Length : 24cm+-
3. Diameter : 5.0mm+- ,Length : 24cm+-

RM13.90
img
SAVERM4.90

[Third Party] Action Base 1 for MG 1/100 and RG,HG 1/144 (Clear Blue)

[TGF] Action Base MG/HG (CLEAR BLUE) (1/100,1/144)

RM15.00
img
SAVERM9.00

[Metal Part] 50pcs - Armor Detail-up 1mm Metal Silver Bead Ball Parts For MG HG Gundam Model

  • 50pcs per pack
  • Can be use as metal screw
  • To customize Armor kit to looks more detail and metal feel
  • For MG, RG or HG and 1/100 or 1/144 scales Gundam Model
  • Size : 1mm diameter

RM3.00
img
SAVERM9.00

[Metal Part] 50pcs - Armor Detail-up 1.5mm Metal Silver Bead Ball Parts For MG HG Gundam Model

  • 50pcs per pack
  • Can be use as metal screw
  • To customize Armor kit to looks more detail and metal feel
  • For MG, RG or HG and 1/100 or 1/144 scales Gundam Model
  • Size : 1.5 mm diameter

RM3.00
img
SAVERM9.00

[Metal Part] 50pcs - Armor Detail-up 2mm Metal Silver Bead Ball Parts For MG HG Gundam Model

  • 50pcs per pack
  • Can be use as metal screw
  • To customize Armor kit to looks more detail and metal feel
  • For MG, RG or HG and 1/100 or 1/144 scales Gundam Model
  • Size : 2mm diameter

RM3.00
img
SAVERM8.90

Water Decal RG/ HG 1/144 00 QAN[T] Gundam

- Water Decal for RG/ HG 00 QAN[T] OO?Qan[T] 
- Not pre-cut
- Best use with Mr. Hobby Mr. Mark Setter / Softer
- 11 cm x 15 cm

Tools:

* Decals
* Mr. Mark Setter (optional)
* Mr. Mark Softer (optional)
* Water
* Cotton buds
* Tweezers
* Paper towel
* Pen Knife

Instructions :
1. Again, cut out the design you want from the decal sheet
2. Using a pair of tweezers/forceps, pick up the decal you cut out and dip in water for roughly 8 seconds. I found that Bandai water-slide decals need less time, maybe 4-6 seconds while custom decals might take longer than 8 seconds. The purpose of this step is to detach the decal from the decal sheet.
3. Using a cotton bud dipped in water, gently ‘tease’ the decal away from the decal sheet and onto your gunpla. If the decal won’t budge from the decal sheet, dip in water for a couple more seconds.
4. Once the decal is on your gunla, you can still adjust or reposition the decal. Once you’re satisfied with the position, use the dry end of the cotton bud to gently roll over decal to absorb extra water.


Water slide decals are activated by water. So it's important to store them away from liquid. 

RM9.00
img
SAVERM6.60

[Third Party] Sinanju (Red) Dedicated Action Base for 1/100 Scale

Sinanju Dedicated Action Base for 1/100 Scale


- Special design for Sinanju
- Non-Bandai Product

RM18.90
img
SAVERM10.10

[Third Party] Action Base 2 HG/RG (Clear Red) (1/144)

[TGF] Action Base HG/RG (Clear RED) (1/144)


Suitable for every 1/144 scale and SD kit.
This is a Non-Bandai product.

RM9.80
img
SAVERM6.10

Bandai Water Decal #108 HGUC Mobile Suit Gundam ZZ Multiuse

[Bandai] Mobile Suit Gundam ZZ (GD108)


For HGUC Mobile Suit Z Gundam , Gundam ZZ Series 1

RM17.90

Showing 31 - 60 of 1224 products